SpriteKit is a 2D game engine. But, even though it provides a built-in lighting system, its limitations make difficult working with specific designs, like pseudo 3D. Unfortunately, CiderKit, the SpriteKit-based game engine I’m working on, calls for more than what’s available out of the box. So I had to find a solution. Here’s how it went.
![]() SpriteKit Sample Image from Apple Developer Website
SpriteKit Sample Image from Apple Developer Website
In its first iteration, CiderKit is designed to handle isometric maps. SpriteKit provides a tile system than can produce such maps. But there’s a catch. In order to achieve complex level designs, I want to support various elevations in the same level, though SpriteKit is limited to a single plane. It was the first blow.
I also wanted to achieve great control over the lighting, notably over intensity and precise near and far attenuations. However, SpriteKit light nodes are limited, preventing me from providing additional data. And last but not least, SpriteKit lights are by definition 2D lights. Due to the complexity of my target lighting model, I needed true 3D positioning.
In front of these issues, I started designing my own solution. But many challenges were still ahead.
I am not entirely sure how SpriteKit handles lighting, but I’m pretty confident it is using a forward rendering strategy. It implies computing lighting as each sprite is rendered, without any regard (and possible optimization) for overdraw1. Isometric maps with elevation can produce a lot of overdraw, with parts of the level occluding others. This problem can also be wildly exacerbated if you add a lot of visual details. I was looking for a solution that would allow me to use many individual lights, so forward rendering was clearly not the best approach.
I immediately settled for a deferred rendering pipeline. As the name suggests, this kind of rendering method defers the lighting phase at the end of the process, allowing for a single computation per pixel and massively limiting the impact of overdraw. However, it requires several preparatory render passes to gather the necessary information like position, orientation, and albedo. But how to do that within the very efficient but rigid update loop of SpriteKit? I would have to find out.
As I stated earlier, SpriteKit lights are not suitable in my case. The second part of my plan then became the implementation of new custom lights. That opened a lot of additional questions. Should they be SpriteKit nodes or only data abstractions? How many can I use at the same time? With how many associated data?
First step to a deferred rendering pipeline: implementing multiple render passes, each associated with a specific information for the light computation. Each of these render passes produces a projection on screen of the corresponding data, stored in a render texture. This way, the final lighting step will know for each pixel of the screen what information to use.
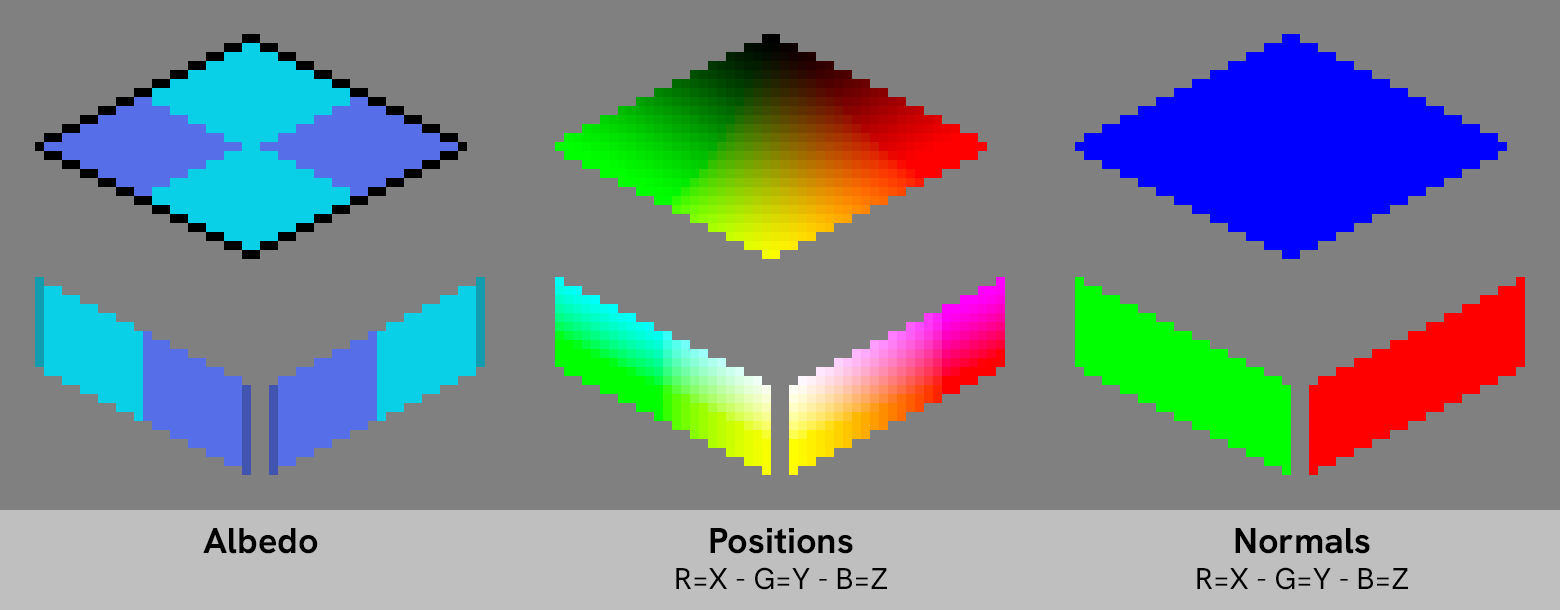
In any given 3D space, in order to shade a scene, in complement of all data from the lights, you need at least three information: position, orientation, and albedo (the “base color” of the material). In a regular 3D pipeline, you would then get 3 render textures: depth, world-aligned normals, and albedo.
With a perspective camera, you can reverse the depth computation in order to obtain the position in space for each pixel. But, with an orthographic camera like the one in CiderKit, depth is not enough. That’s why I had to exchange depth for a true 3D position render texture.
Unfortunately, SpriteKit does not explicitly allow additional render passes or using multiple render targets. The engine is voluntarilly limited to preserve its extreme efficiency. I had to find my way through the various APIs and dig out the hidden gem I needed: SKView.texture(from:)
The figure below illustrates the successive steps of the process:
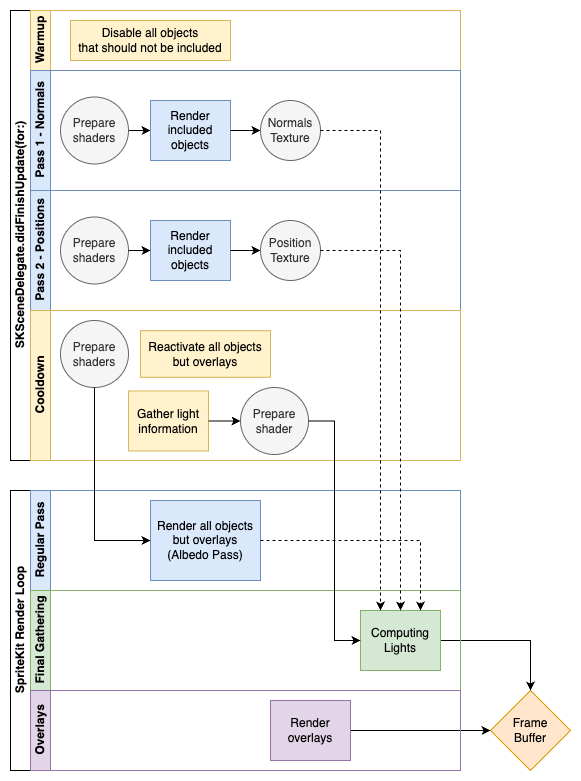
The first four steps are done in the didFinishUpdate(for:) method of an SKSceneDelegate, so after animations and physics have been updated themselves.
The three last steps are handled by the normal SpriteKit render process. Lit objects are rendererd independently of the overlays thanks to this specific scene node layout:
SKScene
  - Underlays container
      - Grid
      - ...
  - SKEffectNode (Lit objects root - holds the final light gathering shader)
      - Map
      - Other lit objects
      - ...
  - Overlays container
      - Gizmos
      - ...
As beautifully complex as this deferred render pipeline can be, it does not provide actual data from the sprites. By themselves, 2D sprites are only that: 2D. For the human eye, they can represent a stylized character, a 3D object, or many other things. But they remain a projection of something on a two-dimensional plane. There is no actual data, notably for orientation or relative position, baked into them. So, I have to provide all of it as supplements.
That’s why lit objects in CiderKit are based on three different textures as illustrated below with the default map blocking textures.
Adjusting and fixing all the render passes was not an easy tasks and there were many bumps on the road. By chance, all of this has not been done blindfolded. Thanks to the Metal Frame Capture tool integrated with Xcode, I was able to understand exactly where things went sideways and react accordingly. This is a very powerful tool I encourage you to dig into if you’re working with Metal-capable devices.
 Metal Frame Capture Graph
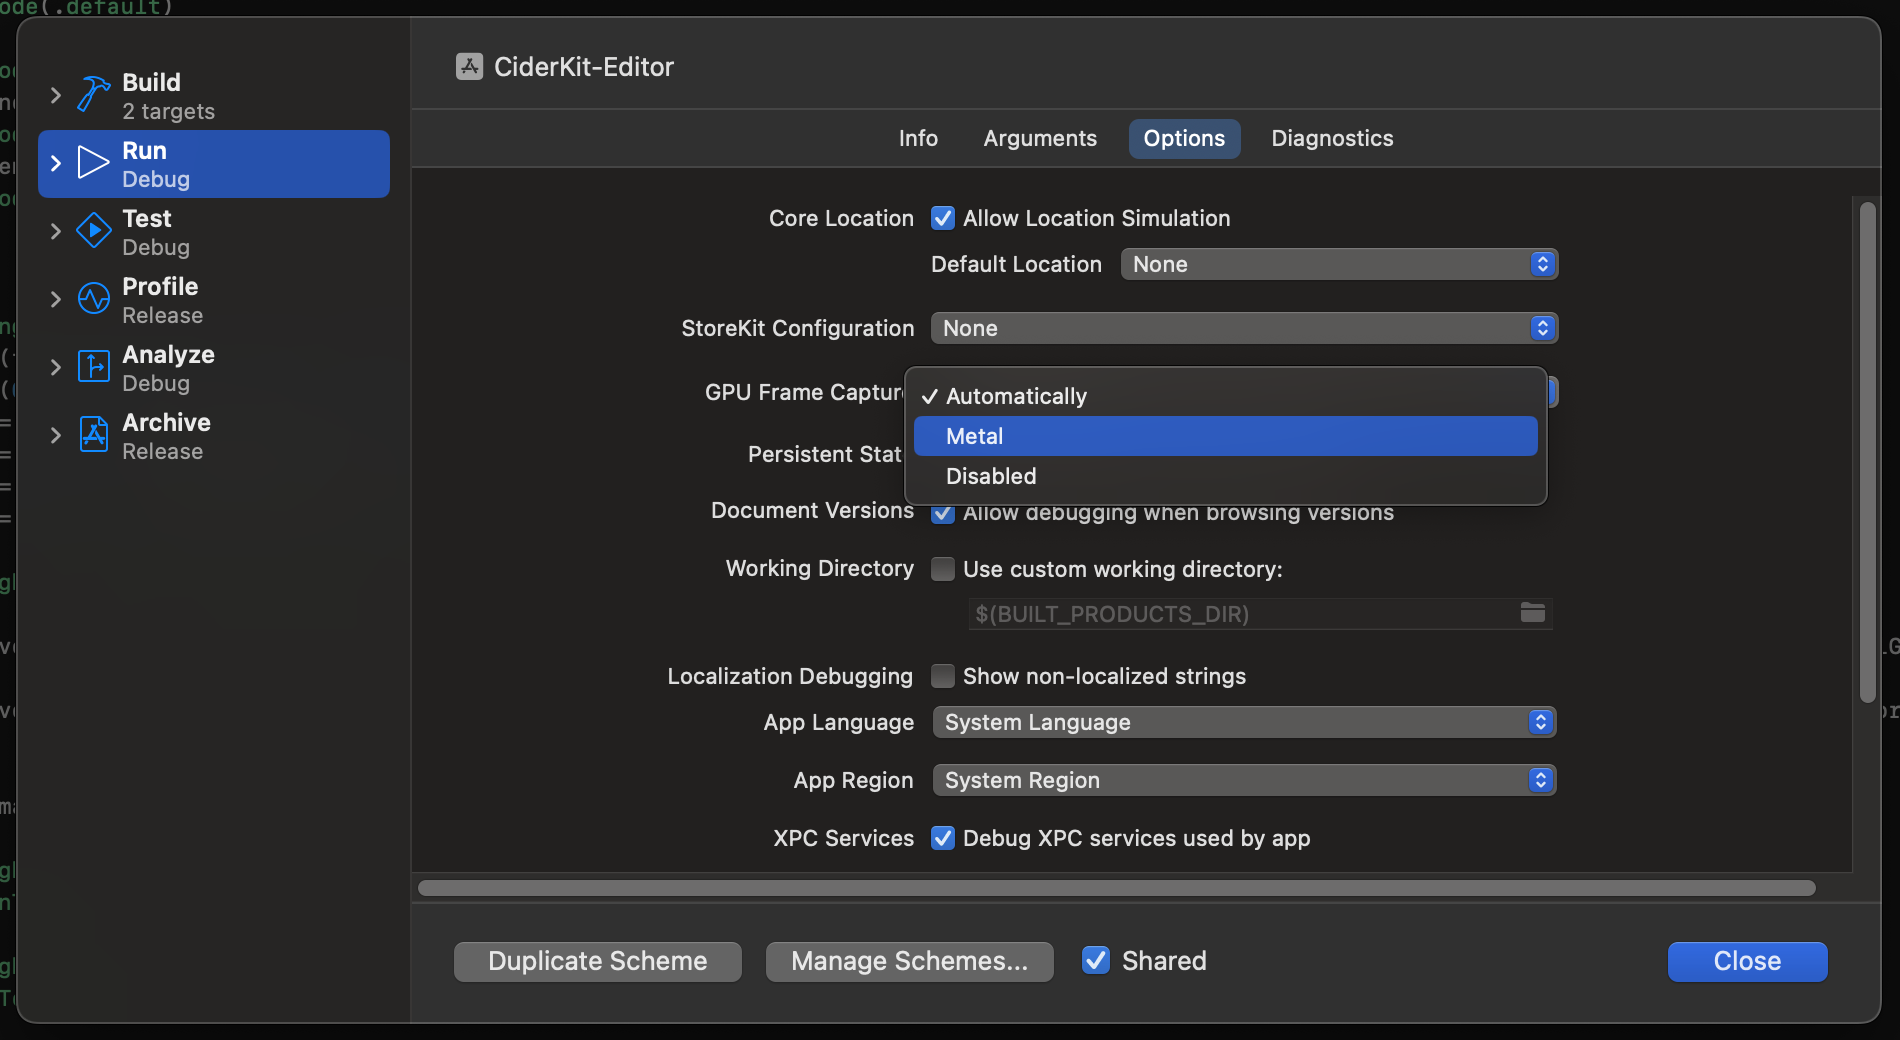
However, if you’re still running an Intel Mac, you may have issues accessing the Metal Frame Capture tool. For some reason, Xcode does not always give you access to it. If this is the case for you, you can force its activation from the scheme editor. Go to Product > Scheme > Edit Scheme…, then select the Run scheme and its Options tab. You should have a setting called GPU Frame Capture. If not already, set it to Metal and the Metal Frame Capture tool should now be available.
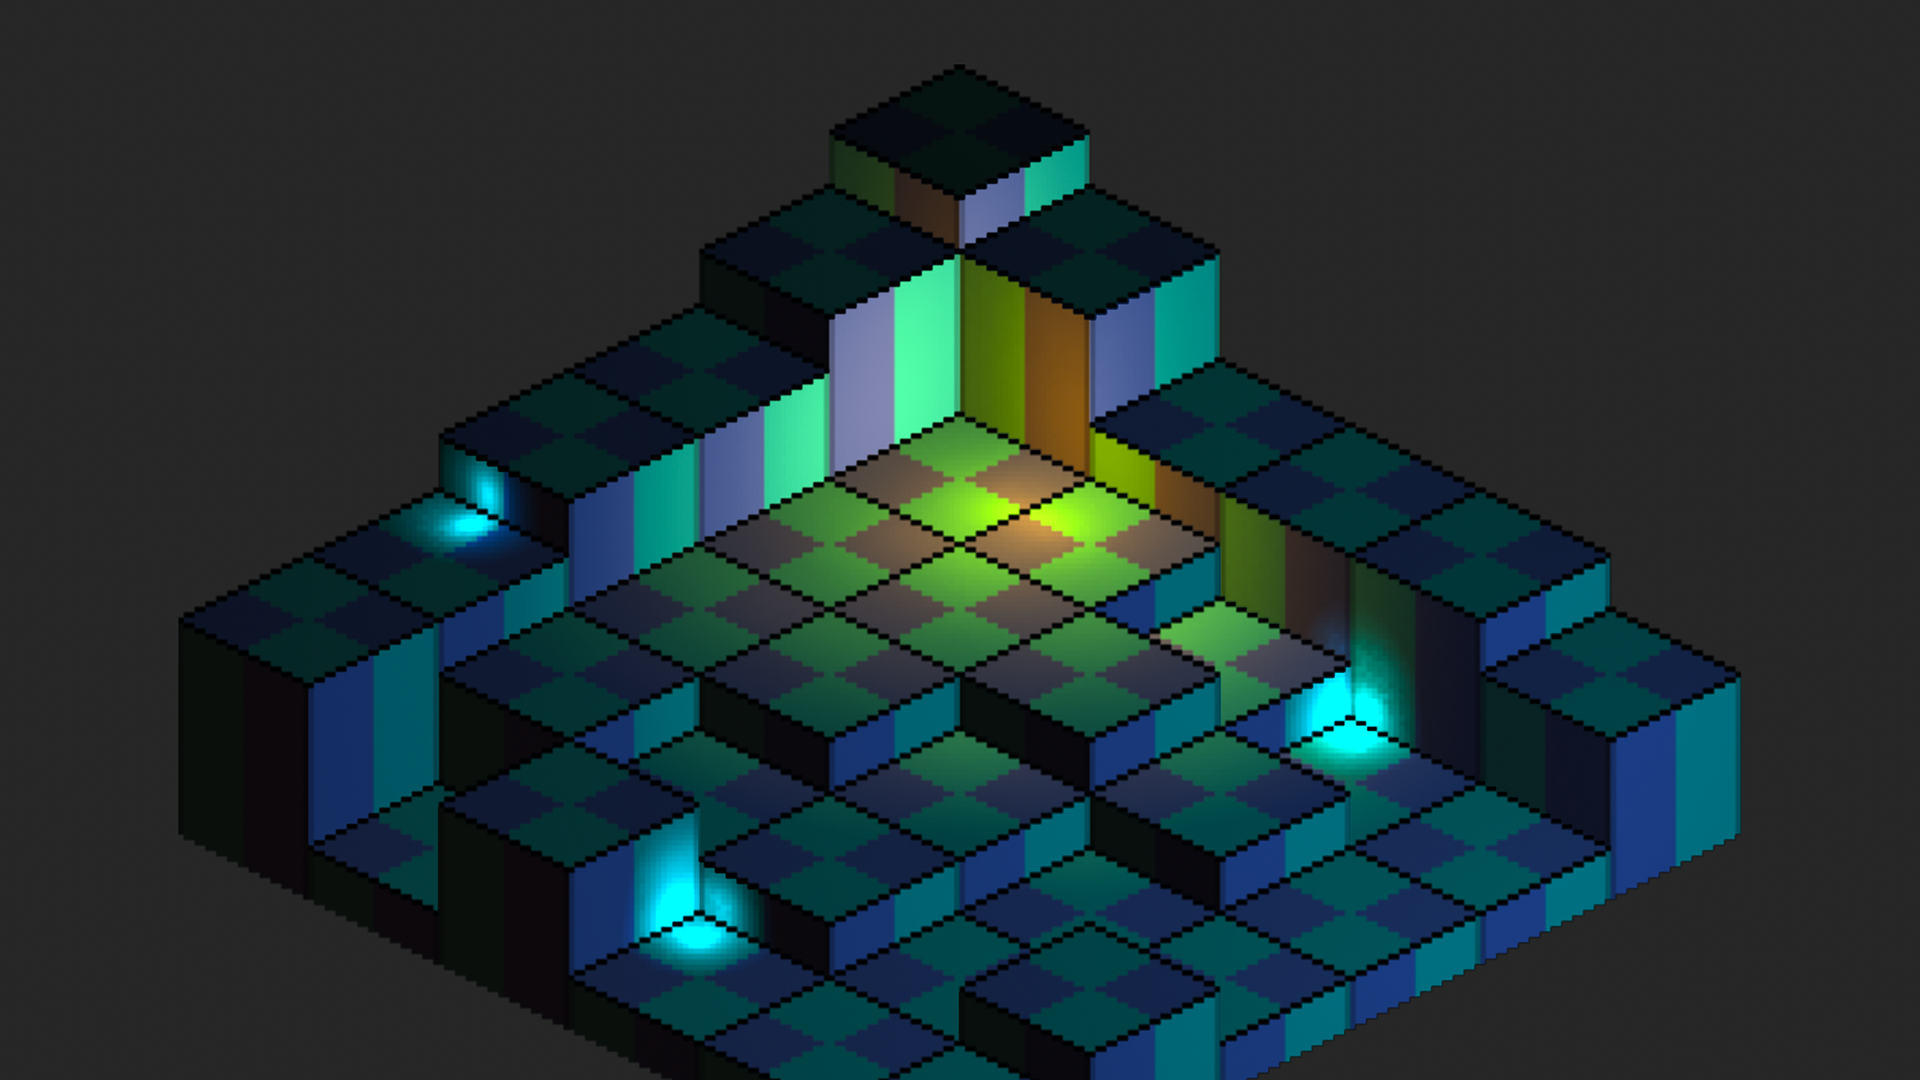
I still have to actually make games out of CiderKit. However, in my humble opinion, visual tests turned out great so far (as you can see on the following video). There are some limitations, like the fact that I am currently limited to 16 concurrent lights during the render phase, but I’m confident all of this won’t be for nothing.
A great art direction with good light control is critical nowadays for your games to stand out of the very populated crowd. This is a first step, won’t be the last, but an important one nonetheless.
Stay tuned for more!
Wherever a sprite is rendered on screen, each of its pixels are computed and drawn. If another opaque sprite is rendered later over the same area of the screen, pixels are computed and drawn once more, potentially invalidating previous computations and wasting time. ↩


